Major Improvement in Mechanic’s Ergonomics

We recently removed the sub-frame from a 1987 BMW 325, with the suspension, transmission and engine accompanying it.

Having the engine out in the open made it a relatively pleasant task to swap out the timing belt and water pump, with the parts being out in the open and so readily accessible.

Unfortunately, after we put everything together, we discovered that the water pump gasket had a leak, and so we need to remove many parts so as to remove the water pump again.  We were not going to remove the sub-frame again, but we also didn’t like the prospect of working on the front of the engine in tight quarters.

So, my contractor came up with a clever plan.  He removed the radiator, air conditioning condenser and grill, and then he had far more convenient access to the front of the car.

The fact that there was no refrigerant in the car’s air conditioning system helped, or we’d have had to deal with that first.

Battery Problems

My 1986 BMW 635 CSi seems to be eating its batteries. I’ve lost track of how many I’ve installed from my stash of used batteries. It’s not clear to me whether these are all coincidentally bad or if the car has some sort of drain.

This morning, the battery was flat again.  My contractor and I towed the car (which also has transmission-related problems) to our local BMW guru, and he is testing the battery.  He made a point that there’s more to testing battery quality than just checking the voltage.  I didn’t know that anything else could viably be tested, but he explained that they have a $380 battery tester that provides far greater insights than a mere voltage tester does.

He also mentioned that, unless it has 11 volts, the computer won’t even work.

I don’t know if the same holds true for the 3-series.

Water Pump Gasket Issues

We installed a new water pump on a 1987 325, and didn’t much like how thin and wavy the gasket was.   Still, we thought we’d gotten it into position well enough, and we installed the water pump and put together whatever goes on top until we could crank the motor.

That’s a lot: all the drive belts, the camshaft belt cover, the fan pulley, the fan and the radiator.

When we poured in coolant then even without the engine running, the coolant leaked out.

We discussed the issue with a smart BMW repair person and he mentioned that the thinness of the gasket isn’t the problem. He suggested we find what else is wrong.

Once again, we removed all the parts that were in the way of the water pump.  We removed the water pump, and found that the flimsy gasket had slipped out of position so that it was in the impeller space. This had created the leak. Here is a picture:

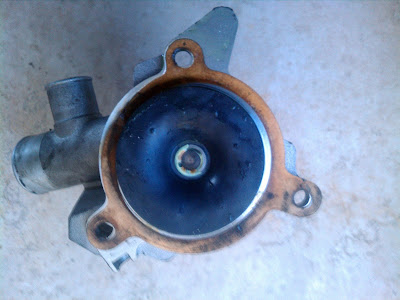
We bought a new slightly thicker gasket for $2 or so, plus a gasket scraper and some silicone-based room-temperature vulcanizing (RTV) glue.

Then, we took everything apart again, made extra sure the metal surface on the engine block was clean, and made extra sure the water pump surface was clean (although both looked fine anyway).

The new gasket went on, with some RTV glue, and the three 13 mm water pump attachment bolts were torqued cheerfully tight.

We attached the various water hoses to the water pump and tightened their clamps.

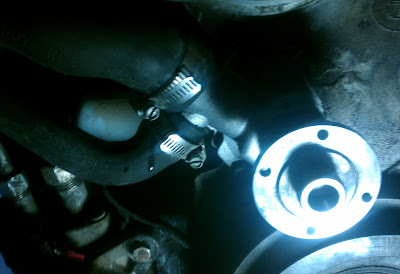
We filled the coolant overflow reservoir with water to put pressure on the seal.  It did not leak.

This test is a good time-saver when there actually is a problem.  Otherwise, time invested in bolting on other components will be doubly wasted if they have to taken off again, if we later find out that the water pump does leak and does have to be removed again.

When doing this test, it’s a good idea to pour in water carefully when the level reached the coolant outlets at the top of the head, or water will spill out of there and make it hard to discern whether a drip was caused by a leaking water pump or the abundance of water pouring out.

Exhaust System

On the 325 of 1987 (and probably many other E30 Models) the exhaust system consists mainly of two large pieces.  They are joined in the middle by two flanges bolted together using three 13 mm bolts with 11 mm nuts.  A gasket is sandwiched in-between the two flanges.

When I undid the flange, neither piece of exhaust system fell on my head.  The front portion is attached to the exhaust manifold. The rear portion is attached to hangers at the rear muffler and another hanger, slightly more forward.

This forward hanger is attached to a metal piece that is attached to the body with a nut or a bolt.

Using a screwdriver, it’s possible to pry the forward hanger loose.  The rearmost ones are more difficult.  They are best pried loose after pivoting them 90 degrees, and that’s best done after loosening (using a 13 mm nut, as I recall) each end’s attachment to the rear muffler. On one side, there’s a metal attachment point. On the other side is a metal attachment point plus a strap that goes above to the muffler to the metal attachment point on the other side.

It’s easier to work on the rear hangers after you remove the heat shield that’s above the rear muffler.  These are attached using four 10 mm nuts.

To re-install the rear hanger, it’s easier if you have two people helping: one to position the muffler “just so” and one to pry the hanger into position.  Typically, a flat-headed screwdriver is helpful.  This is far easier to do with the hanger elongated, which is accomplished by turning it through 90 degrees.  After everything is in position, the hanger can be snugged up by turning it through 90 degrees again.

On the 1985 model, the heat shield plate has a more symmetrical shape than on the 1987 model.  The rear hangers are also positioned differently.

It’s easy to drop the muffler and have it bend the strap attached to it, which is not the ideal situation.

At the exhaust manifold, the downpipe part of the exhaust system branches into two pipes.  Each one of them attaches to the manifold with a three-stud flange.  The studs are embedded in the manifold, and then six 14 mm nuts attach the downpipe.

A wire with a round plug attaches to the oxygen sensor, at the downpipe.

I sell these parts used (except for the catalytic converter that’s attached to the front portion of the exhaust).  Likely prices (might vary a bit due to supply and demand, and condition) for items in generally workable condition:

  • For the front part without the oxygen sensor and catalytic converter: $40
  • For the rear part with the muffler: $60
  • For the metal piece for the middle hanger: $5
  • For the metal piece for the outboard side rear hanger : $10
  • For the metal piece for the inboard side rear hanger : $15
  • For the middle hanger: $5
  • For the outboard side rear hanger : $5
  • For the inboard side rear hanger : $5
  • For the oxygen sensor: $30
  • For the flange gasket: $5
  • For the exhaust manifold: $20
  • For heat shield above the rear muffler: $10

Probably, a set of fasteners, to replace those that were stripped or lost, might be nice. Here’s what I would most likely charge:

  • For the set of six nuts that attach the downpipe to exhaust manifold: $10
  • For the set of three flange nuts and bolts: $5
  • For the pair of bolts that attach the hanger’s metal pieces to the rear muffler: $5
  • For the set of four heat shield nuts: $5

Losing Fasteners and Parts

When I was preparing to yank the engine and transmission out of my 1987 325, I arranged the parts and fasteners in a nice row on the shop floor, in the sequence in which I removed them.

But, instead of lasting a week, the project took more than a month.  In the process, some kitty litter engulfed my nice row, and things needed to occupy the same space and the items were moved. All this was done for logical-enough reasons, but now it’s an Easter Egg hunt to find the parts and fasteners.

Next time, I’m being more cynical.  Right now, my best idea for next time is to have a bunch of tin cans wired or taped together, with the size of each can corresponding to the size of the fasteners and parts I plan to drop into each can.  Obviously, I’d have to plan the work ahead of time, but that’s not a bad thing.  I could even stick some labels on the sides of the cans, to show what should go into that particular can. The label could even identify which tools I should use.  This way, the set of cans might actually help guide the sequence of events.  In case of surprises, I’d have a few extra cans.

The labels would be helpful when I take things apart and also when I put them together again.

I plan to attach the set of containers to a rotating belt, so that I can move the can that I’ve just used out of the way, and bring closer to me the next can that I plan to use.

Often, when I remove fasteners, I put them back onto the place where they came from, so that I don’t lose the fasteners.

Instead, I’d now need to put into storage containers all fasteners that I undo.

ZF HP 4-22 Bell-Housing Blues

On the 1991 325, I saw no wires going to the bell-housing.

On the 1985 325, I saw wires going to the bell-housing.  Presumably, these are for the flywheel position sensor.

And, the bell-housing otherwise seems to be the same, i.e., it didn’t get re-cast to not have the holes where the wires go in.

I offer used bell-housings for $20 each.

ZF HP 4-22 Oil Pan

Now and then, I do something dumb.  Most recently, this resulted in a hole in the oil pan of my ZF HP 4-22 automatic transmission as used on the E30 325.

If you need an oil pan, I sell these for $15 each.  At that price, I expect they will work fine but they won’t win beauty contest, i.e., they will have scratches and maybe minor dents.

This will be without the drain plug or magnets.  The plug is $5 for a not-stripped yet not-pristine version. The magnets are $3 each, and there are two.


Shifter Upper Hardware

On the 1987 stick shift 325, the shifter goes through a rubber grommet about 4″ in diameter.  Once the shifter mechanism is attached to the body of the car, the upward pressure will wedge the grommet in place.

Before that happens, feed the back-up light wiring down into the hole, from the top of the carpeted transmission tunnel down to where it will connect to an electrical plug on the actual transmission.

I have yet to see a grommet that’s not badly torn.

Fit the gearshift lever through the cosmetic cover, whose vinyl I have only seen in torn condition except for the brief period after I bought a new unit from the dealer for $81.  It soon was torn too, even though I tried to baby it.

Snap the cover into place.

Lastly, snug the gearshift knob onto the lever.

If I can ever get my hands on a decent grommet, I plan to sell it for $10.  I expect it’ll still be imperfect but not completely thrashed like the units I have seen.

A decent-looking cosmetic cover, if I can ever find one, I plan to offer for $20.  I expect it’ll also be imperfect but not as badly torn as most.

I also offer the stock gearshift knob for $10.

Feeding Fuel Injection Wiring Harness Through Hole in Firewall

On 1987 cars anyway, the fuel injection wiring harness is a complex beast, and it doesn’t much like going through the hole in the firewall and the rubber grommet fitting snugly.

To persuade it to move into position better, BMW fitted some rubber handles to the wiring harness so that you can go inside the car and use these to yank the wiring harness into the car better.

In retrospect, I’d have used some water-based lubricant to ease the way.  Once dry, it would no longer have been slippery.

It helps to have person A shove the wiring into the hole from the outside while person B is inside the car, tugging on the handles.